© 2014-2025 JaimePOS LLC all rights reserved

Apex Pro Black Cash Drawer - 16in - 18in
$110.00 – $130.00
Star Micronics TSP143IV Thermal Printer TSP100IV – USB + Ethernet – WLAN + Ethernet + USB
$280.00 – $385.00
In the box:
•TSP143IVUE printer
•USB & ethernet cable
•Setup guide
•Starter paper roll
•Power supply
SKU:
TSP143iV-blk-wht
Category: Thermal Printers
Tags: star micronics pos printer, Star Micronics TSP100IV thermal printer, Star Micronics TSP143IV thermal printer, Star thermal printer
Description
Cutting Edge Design in a Smaller Footprint
With a modern, compact design, the TSP143IV series thermal printer boasts a 20% smaller footprint than its predecessor, the TSP143III. This future-proof printing solution provides maximum flexibility when connecting to any network with added features like support for the Android Open Accessory (AOA) protocol and a USB/LAN Dual Interface (TSP143IVUE) or WLAN capability with a dual-band wireless connection (TSP143IVUW). All models support Windows, iOS, Android, web- and cloud-based applications and are Cloud Ready, connecting to any cloud application that supports Star’s CloudPRNT technology. The TSP143IV can also connect to Star Micronics Cloud Services for real-time device monitoring, Digital Journal, custom-designed coupons with PromoPRNT, and much more. This series has effortless installation with an internal power supply and “drop-in and print” paper loading, making it a perfect companion for any mPOS or POS bundle.
Features
Compact and Ultra Modern Design
CloudPRNT Technology Supported
Future-Proof Connectivity
Easy Installation
Cloud Ready for Star Cloud Services
TSP143IV is fully compatible with its previous versions
250mm/s High-Speed Printing
AOA, USB/LAN Dual Interface (TSP143IVUE)
Reliable thermal printer
Special de-curl function
Internal power supply
Drop-In and Print paper loading
Auto-cutter
Paper end sensor
High-speed printing: 250mm/s
Small foot print
High quality graphics printing (logos and coupons) with PROMOPRNT
Includes
TSP143iVUE printer
Starter paper roll
Paper guide
Ethernet cable
USB cable
PromoPRNT and AllReceipts™
Power cable
Add-Ons
- Thermal Paper Rolls
Customer display
Buzzer
mUnite POS stand
Star Scanners to communicate through USB-A port
mC Sound
Specifications:
Weight Approx: 2.87 lbs
Dimensions: 5.5"W x 4.84"D x 6.65"H
Frequently Asked Questions:
1) Turn the power on
Set paper with the power turned on to automatically feed and cue the paper.

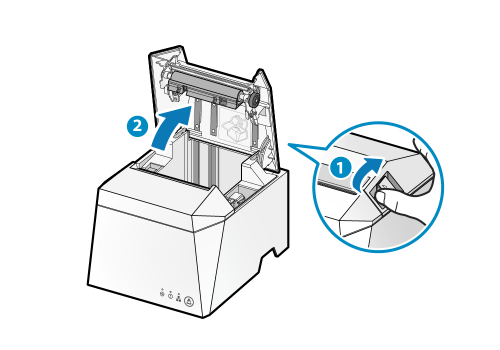
2. Open the printer cover
Push the opening lever (1) to open the printer cover (2).

Note
When replacing paper, remove the paper core remaining in the paper roll holder.
3) Set paper
Set the paper roll in the direction shown in the illustration (3).

Note
To prevent a paper jam, carefully wind the paper tightly from the paper roll before setting it in the printer.
When using vertically
If the unit is set up vertically using the provided rubber feet or the wall-mounting holes, set the paper roll as shown in the following illustration.

4) Close the printer cover
Pull the end of the paper straight out (4), sandwich the paper and close the printer cover.
The setting is completed when the paper is cut automatically.

Push both sides as shown in the diagram and close the printer cover.

Note
Remove the cut paper that was cut automatically.
CloudPRNT is an innovative technology enabling users to connect to Star Micronics printers directly from a server rather than a local device. CloudPRNT is ideal for printing and retrieving printer status from cloud- or web-based point-of-sale solutions. Flexible and adaptable, CloudPRNT is built on the solution provider’s servers in their preferred language and architecture.
Star Cloud Services (www.starmicronicscloud.com) bring IoT solutions to retailers by enabling Star Micronics POS printers to become cloud-connected devices. By transforming receipt printers into cloud-connected devices, Star Cloud Services allow retailers to better engage shoppers, applying device settings remotely and managing printer status in real-time. Star also offers POS service providers device management for receipt printers, digital journals, and printed promotion cloud management free-of-charge for any POS application. A customized API is available for integration into current loyalty and retailer card programs. Please contact Star for more information.
Additional information
| Weight | 6 lbs |
|---|---|
| Dimensions | 7 × 6 × 10 in |
Reviews (0)
Be the first to review “Star Micronics TSP143IV Thermal Printer TSP100IV – USB + Ethernet – WLAN + Ethernet + USB” Cancel reply
You must be logged in to post a review.
Shipping & Delivery
You may also like…
Related products
Epson TM-L90 Thermal Label Printer
$359.00 – $525.00
Select options
This product has multiple variants. The options may be chosen on the product page
Epson TM-M30II Thermal Printer USB+Ethernet – Ethernet+Bluetooth – USB+Ethernet+WiFi
$245.00 – $305.00
In the box:
•TM-M30 printer
•Setup guide
•Starter paper roll
•Power supply
•Switch cover
•58mm paper roll guide
Select options
This product has multiple variants. The options may be chosen on the product page
Epson TM-M50 Thermal Printer USB+Ethernet+Bluetooth
$300.00
In the box:
•TM-M50 printer
•Setup guide
•Starter paper roll
•Power supply
•USB Cable
•Power switch cover
•58mm paper roll guide
Select options
This product has multiple variants. The options may be chosen on the product page
SNBC BTP-R180II Thermal Printer USB+Serial+Ethernet
$150.00
SNBC BTP-R580II Thermal Printer USB – USB+Ethernet
$210.00 – $315.00
In the box:
•BTP-R580II Printer
•Starter Paper Roll
•USB Cable / Communications Cable
•Internal Power Supply & Power Cord
•Quick Reference Manual
Select options
This product has multiple variants. The options may be chosen on the product page
Star Micronics mC-Label3 Sticky Label Printer – USB+LAN – LAN+Bluetooth – LAN+WLAN – WLAN+Bluetooth
$520.00 – $660.00
In the box: • mC-Label3 Printer • Power Supply • Safety Guide • USB & LAN Cable • Self-Cleaning Paper Roll • Setup Sheet
Select options
This product has multiple variants. The options may be chosen on the product page
Star Micronics TSP143IV SK Sticky Label Printer – WLAN -ETH
$345.00 – $430.00
In the box: • TSP143IV SK Printer • Power Cable • Paper Roll Guide (58mm & 40mm) • LAN & USB Cable • Rubber Feet x 2 • Setup Guide
Select options
This product has multiple variants. The options may be chosen on the product page


Reviews
There are no reviews yet.